快速开始
1. 引入 Spring Cloud Contract
Spring Cloud Contract 将测试驱动开发(TDD)提升到了软件架构的层面。它允许您执行消费者驱动和生产者驱动的契约测试。
1.1. 历史
在成为 Spring Cloud Contract 之前,该项目曾名为 Accurest。它由 Marcin Grzejszczak 和 Jakub Kubrynski(来自 Codearte)创建。
版本 0.1.0 的发布于 2015 年 1 月 26 日进行,随后在 2016 年 2 月 29 日发布的 1.0.0 版本中趋于稳定。
1.1.2. 测试问题
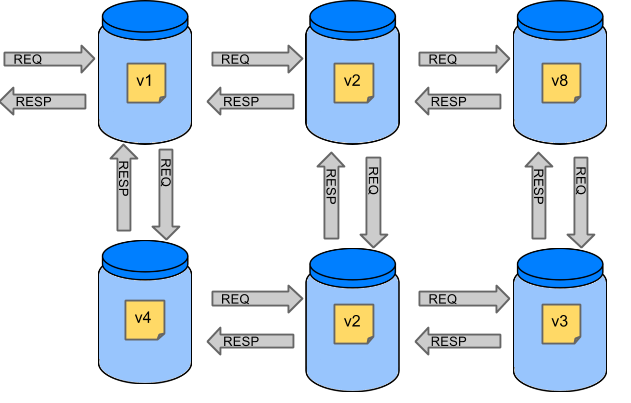
如果我们想测试前一节图片左上角的应用程序,以确定它能否与其他服务通信,我们可以采取以下两种方法之一:
-
部署所有微服务并执行端到端测试。
-
在单元测试和集成测试中模拟其他微服务。
两者各有其优势,但也存在许多劣势。
部署所有微服务并执行端到端测试
优势:
-
模拟生产环境。
-
测试服务之间的实际通信。
缺点:
-
要测试一个微服务,我们必须部署六个微服务、若干数据库及其他组件。
-
测试运行的环境在单个测试套件运行期间被锁定(在此期间其他人无法运行测试)。
-
它们运行需要很长时间。
-
反馈在流程中来得非常晚。
-
它们极难调试。
在单元测试和集成测试中模拟其他微服务
优势:
-
它们提供非常快速的反馈。
-
它们没有基础设施要求。
缺点:
-
服务的实现者创建的存根可能与现实毫无关联。
-
你可以通过测试但生产环境失败的情况下上线。
为了解决上述问题,Spring Cloud Contract 应运而生。其核心思想是,在无需搭建整个微服务生态系统的情况下,为您提供极快的反馈。如果您正在使用存根(stubs),那么您只需启动那些您的应用直接依赖的应用程序即可。下图展示了存根与应用程序之间的关系:
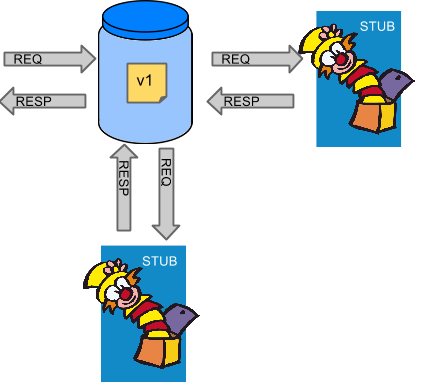
Spring Cloud Contract 使您能够确信,您所使用的存根(stubs)是由您调用的服务创建的。此外,如果可以使用这些存根,说明它们已在生产者端(producer’s side)经过测试。简而言之,您可以信赖这些存根。
1.2. 目的
Spring Cloud Contract 的主要目的包括:
-
为了确保HTTP和消息存根(在开发客户端时使用)能够完全执行实际服务器端实现的功能。
-
为了推广ATDD(验收测试驱动开发)方法以及微服务架构风格。
-
提供一种方式,以发布合同中的变更,使双方都能立即看到这些变更。
-
生成用于服务器端使用的样板测试代码。
默认情况下,Spring Cloud Contract 将 Wiremock 集成作为 HTTP 服务器存根。
| Spring Cloud Contract 的目的并非是在契约中开始编写业务功能。假设我们有一个欺诈检查的业务用例。如果用户可能因 100 种不同原因被判定为欺诈,我们假定您会创建两个契约:一个用于正向情况(即未检测到欺诈),另一个用于负向情况(即检测到欺诈)。契约测试用于测试应用之间的契约,而非模拟完整的系统行为。 |
1.3 合同是什么?
作为服务的消费者,我们需要明确我们究竟希望实现什么目标。我们需要制定我们的期望。这就是为什么我们要编写契约。换句话说,契约是关于API或消息通信应如何呈现的协议。考虑以下示例:
假设您希望发送一个包含客户公司ID及它欲向我们借款金额的请求。同时,您希望使用 PUT 方法将该请求发送至 /fraudcheck URL。以下列表展示了在 Groovy 和 YAML 中用于检查客户是否应被标记为欺诈行为的契约:
/*
 * Copyright 2013-2020 the original author or authors.
 *
 * Licensed under the Apache License, Version 2.0 (the "License");
 * you may not use this file except in compliance with the License.
 * You may obtain a copy of the License at
 *
 *      https://www.apache.org/licenses/LICENSE-2.0
 *
 * Unless required by applicable law or agreed to in writing, software
 * distributed under the License is distributed on an "AS IS" BASIS,
 * WITHOUT WARRANTIES OR CONDITIONS OF ANY KIND, either express or implied.
 * See the License for the specific language governing permissions and
 * limitations under the License.
 */

package contracts

org.springframework.cloud.contract.spec.Contract.make {
    request { // (1)
        method 'PUT' // (2)
        url '/fraudcheck' // (3)
        body([ // (4)
               "client.id": $(regex('[0-9]{10}')),
               loanAmount : 99999
        ])
        headers { // (5)
            contentType('application/json')
        }
    }
    response { // (6)
        status OK() // (7)
        body([ // (8)
               fraudCheckStatus  : "FRAUD",
               "rejection.reason": "Amount too high"
        ])
        headers { // (9)
            contentType('application/json')
        }
    }
}

/*
From the Consumer perspective, when shooting a request in the integration test:

(1) - If the consumer sends a request
(2) - With the "PUT" method
(3) - to the URL "/fraudcheck"
(4) - with the JSON body that
 * has a field `client.id` that matches a regular expression `[0-9]{10}`
 * has a field `loanAmount` that is equal to `99999`
(5) - with header `Content-Type` equal to `application/json`
(6) - then the response will be sent with
(7) - status equal `200`
(8) - and JSON body equal to
 { "fraudCheckStatus": "FRAUD", "rejectionReason": "Amount too high" }
(9) - with header `Content-Type` equal to `application/json`

From the Producer perspective, in the autogenerated producer-side test:

(1) - A request will be sent to the producer
(2) - With the "PUT" method
(3) - to the URL "/fraudcheck"
(4) - with the JSON body that
 * has a field `client.id` that will have a generated value that matches a regular expression `[0-9]{10}`
 * has a field `loanAmount` that is equal to `99999`
(5) - with header `Content-Type` equal to `application/json`
(6) - then the test will assert if the response has been sent with
(7) - status equal `200`
(8) - and JSON body equal to
 { "fraudCheckStatus": "FRAUD", "rejectionReason": "Amount too high" }
(9) - with header `Content-Type` matching `application/json.*`
*/request: # (1)
method: PUT # (2)
url: /yamlfraudcheck # (3)
body: # (4)
"client.id": 1234567890
loanAmount: 99999
headers: # (5)
Content-Type: application/json
matchers:
body:
- path: $.['client.id'] # (6)
type: by_regex
value: "[0-9]{10}"
response: # (7)
status: 200 # (8)
body: # (9)
fraudCheckStatus: "FRAUD"
"rejection.reason": "Amount too high"
headers: # (10)
Content-Type: application/json
#From the Consumer perspective, when shooting a request in the integration test:
#
#(1) - If the consumer sends a request
#(2) - With the "PUT" method
#(3) - to the URL "/yamlfraudcheck"
#(4) - with the JSON body that
# * has a field `client.id`
# * has a field `loanAmount` that is equal to `99999`
#(5) - with header `Content-Type` equal to `application/json`
#(6) - and a `client.id` json entry matches the regular expression `[0-9]{10}`
#(7) - then the response will be sent with
#(8) - status equal `200`
#(9) - and JSON body equal to
# { "fraudCheckStatus": "FRAUD", "rejectionReason": "Amount too high" }
#(10) - with header `Content-Type` equal to `application/json`
#
#From the Producer perspective, in the autogenerated producer-side test:
#
#(1) - A request will be sent to the producer
#(2) - With the "PUT" method
#(3) - to the URL "/yamlfraudcheck"
#(4) - with the JSON body that
# * has a field `client.id` `1234567890`
# * has a field `loanAmount` that is equal to `99999`
#(5) - with header `Content-Type` equal to `application/json`
#(7) - then the test will assert if the response has been sent with
#(8) - status equal `200`
#(9) - and JSON body equal to
# { "fraudCheckStatus": "FRAUD", "rejectionReason": "Amount too high" }
#(10) - with header `Content-Type` equal to `application/json`2. 三秒之旅
本简短的指南介绍了如何使用 Spring Cloud Contract。它包含以下主题:
您可以在此处找到更详细的指南。
以下UML图显示了Spring Cloud Contract中各部分之间的关系:
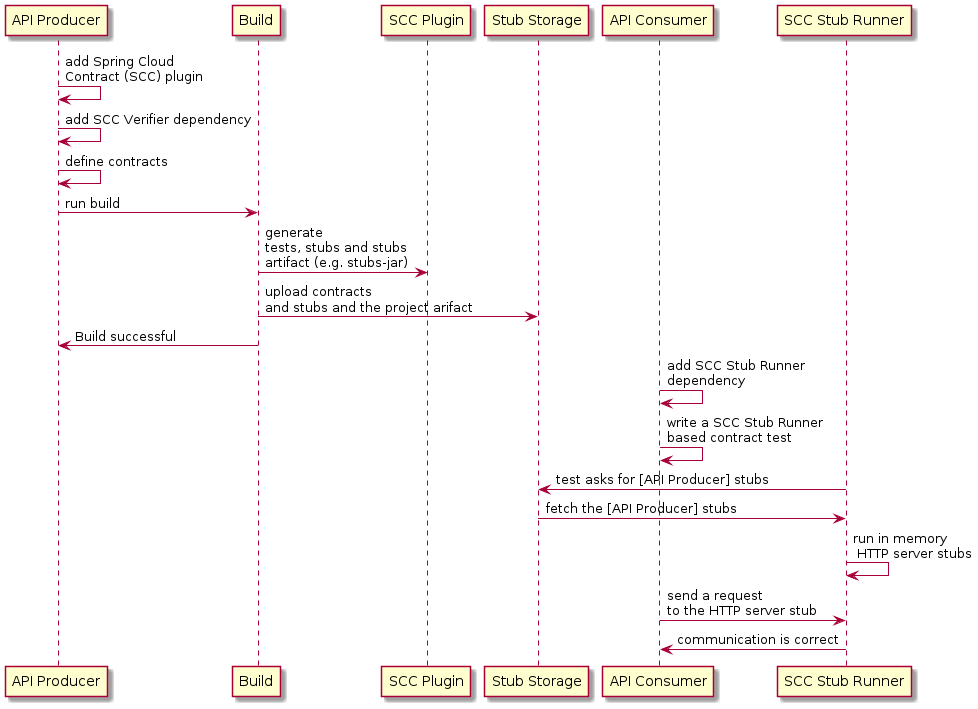
2.1. 在生产者端
要开始使用 Spring Cloud Contract,您可以将使用 Groovy DSL 或 YAML 编写的 REST 或消息契约文件添加到 contracts 目录中,该目录由 contractsDslDir 属性指定。默认情况下,其值为 $rootDir/src/test/resources/contracts。
然后,您可以在构建文件中添加 Spring Cloud Contract Verifier 依赖项和插件,如下所示的示例:
<dependency>
    <groupId>org.springframework.cloud</groupId>
    <artifactId>spring-cloud-starter-contract-verifier</artifactId>
    <scope>test</scope>
</dependency>
以下列表显示了如何添加插件,该插件应放置在文件的 build/plugins 部分中:
<plugin>
    <groupId>org.springframework.cloud</groupId>
    <artifactId>spring-cloud-contract-maven-plugin</artifactId>
    <version>${spring-cloud-contract.version}</version>
    <extensions>true</extensions>
</plugin>
运行 ./mvnw clean install 会自动生成测试用例,以验证应用程序对新增契约的合规性。默认情况下,测试用例将生成于 org.springframework.cloud.contract.verifier.tests. 目录下。
由于尚未实现由契约所描述的功能,测试失败。
要使它们通过,您必须添加正确的 HTTP 请求或消息处理实现。此外,您还必须将一个基础测试类添加到项目中,以便自动生成的测试使用该类。所有自动生成的测试都继承自该类,它应包含运行这些测试所需的所有设置信息(例如 RestAssuredMockMvc 控制器设置或消息测试设置)。
以下示例来自 pom.xml,展示了如何指定基础测试类:
<build>
        <plugins>
            <plugin>
                <groupId>org.springframework.cloud</groupId>
                <artifactId>spring-cloud-contract-maven-plugin</artifactId>
                <version>2.1.2.RELEASE</version>
                <extensions>true</extensions>
                <configuration>
                    <baseClassForTests>com.example.contractTest.BaseTestClass</baseClassForTests> (1)
                </configuration>
            </plugin>
            <plugin>
                <groupId>org.springframework.boot</groupId>
                <artifactId>spring-boot-maven-plugin</artifactId>
            </plugin>
        </plugins>
    </build>
| 1 | 元素让您能够指定基础测试类。它必须是 configuration 元素的子元素,而该 configuration 元素又需位于 spring-cloud-contract-maven-plugin 元素内部。 |
一旦实现和测试基类到位,测试即可通过,且应用程序和存根工件均已在本地 Maven 仓库中构建并安装。现在您可以合并这些更改,并将应用程序和存根工件发布到在线仓库中。
2.2. 在消费者端
您可以在集成测试中使用 Spring Cloud Contract Stub Runner 来获取一个正在运行的 WireMock 实例或消息路由,以模拟实际的服务。
为此,请将依赖项添加到 Spring Cloud Contract Stub Runner,如下例所示:
<dependency>
    <groupId>org.springframework.cloud</groupId>
    <artifactId>spring-cloud-starter-contract-stub-runner</artifactId>
    <scope>test</scope>
</dependency>
您可以通过以下两种方式之一,将生产者端存根安装到您的Maven仓库中:
-
通过检出生产者端仓库,并添加契约(contracts)并生成存根(stubs),可运行以下命令:
$ cd local-http-server-repo
$ ./mvnw clean install -DskipTests
| 测试被跳过,因为生产者端契约实现尚未到位,因此自动生成的契约测试失败。 |
-
通过从远程仓库获取已存在的生产者服务存根。为此,可将存根工件ID和工件仓库URL作为
Spring Cloud Contract Stub Runner属性传入,如下例所示:stubrunner: ids: 'com.example:http-server-dsl:+:stubs:8080' repositoryRoot: https://repo.spring.io/libs-snapshot
现在,您可以使用 @AutoConfigureStubRunner 注解您的测试类。在注解中,为 Spring Cloud Contract Stub Runner 提供 group-id 和 artifact-id 的值,以便为您运行协作对象的存根(stubs),如下例所示:
@RunWith(SpringRunner.class)
@SpringBootTest(webEnvironment=WebEnvironment.NONE)
@AutoConfigureStubRunner(ids = {"com.example:http-server-dsl:+:stubs:6565"},
stubsMode = StubRunnerProperties.StubsMode.LOCAL)
public class LoanApplicationServiceTests {
. . .
}在从在线仓库下载存根时使用 REMOTE 和 stubsMode,而在离线工作时使用 LOCAL。 |
现在,在您的集成测试中,您可以接收来自协作服务的存根版本的 HTTP 响应或预期由协作服务发出的消息。
3. 开发您的第一个基于 Spring Cloud Contract 的应用程序
本简短指南介绍了如何使用 Spring Cloud Contract。其内容包括以下主题:
您可以在这里找到更简短的指南。
为了便于本示例说明,Stub Storage 代表 Nexus/Artifactory。
以下UML图显示了Spring Cloud Contract各部分之间的关系:
3.1. 在生产者端
要开始使用 Spring Cloud Contract,您可以在构建文件中添加 Spring Cloud Contract Verifier 依赖项和插件,如下例所示:
<dependency>
<groupId>org.springframework.cloud</groupId>
<artifactId>spring-cloud-starter-contract-verifier</artifactId>
<scope>test</scope>
</dependency>以下列表显示了如何添加插件,该插件应放置在文件的 build/plugins 部分中:
<plugin>
<groupId>org.springframework.cloud</groupId>
<artifactId>spring-cloud-contract-maven-plugin</artifactId>
<version>${spring-cloud-contract.version}</version>
<extensions>true</extensions>
</plugin>|
最简单的入门方式是前往 Spring Initializr,并添加“Web”和“Contract Verifier”作为依赖项。这样做会引入前述所提及的依赖项以及 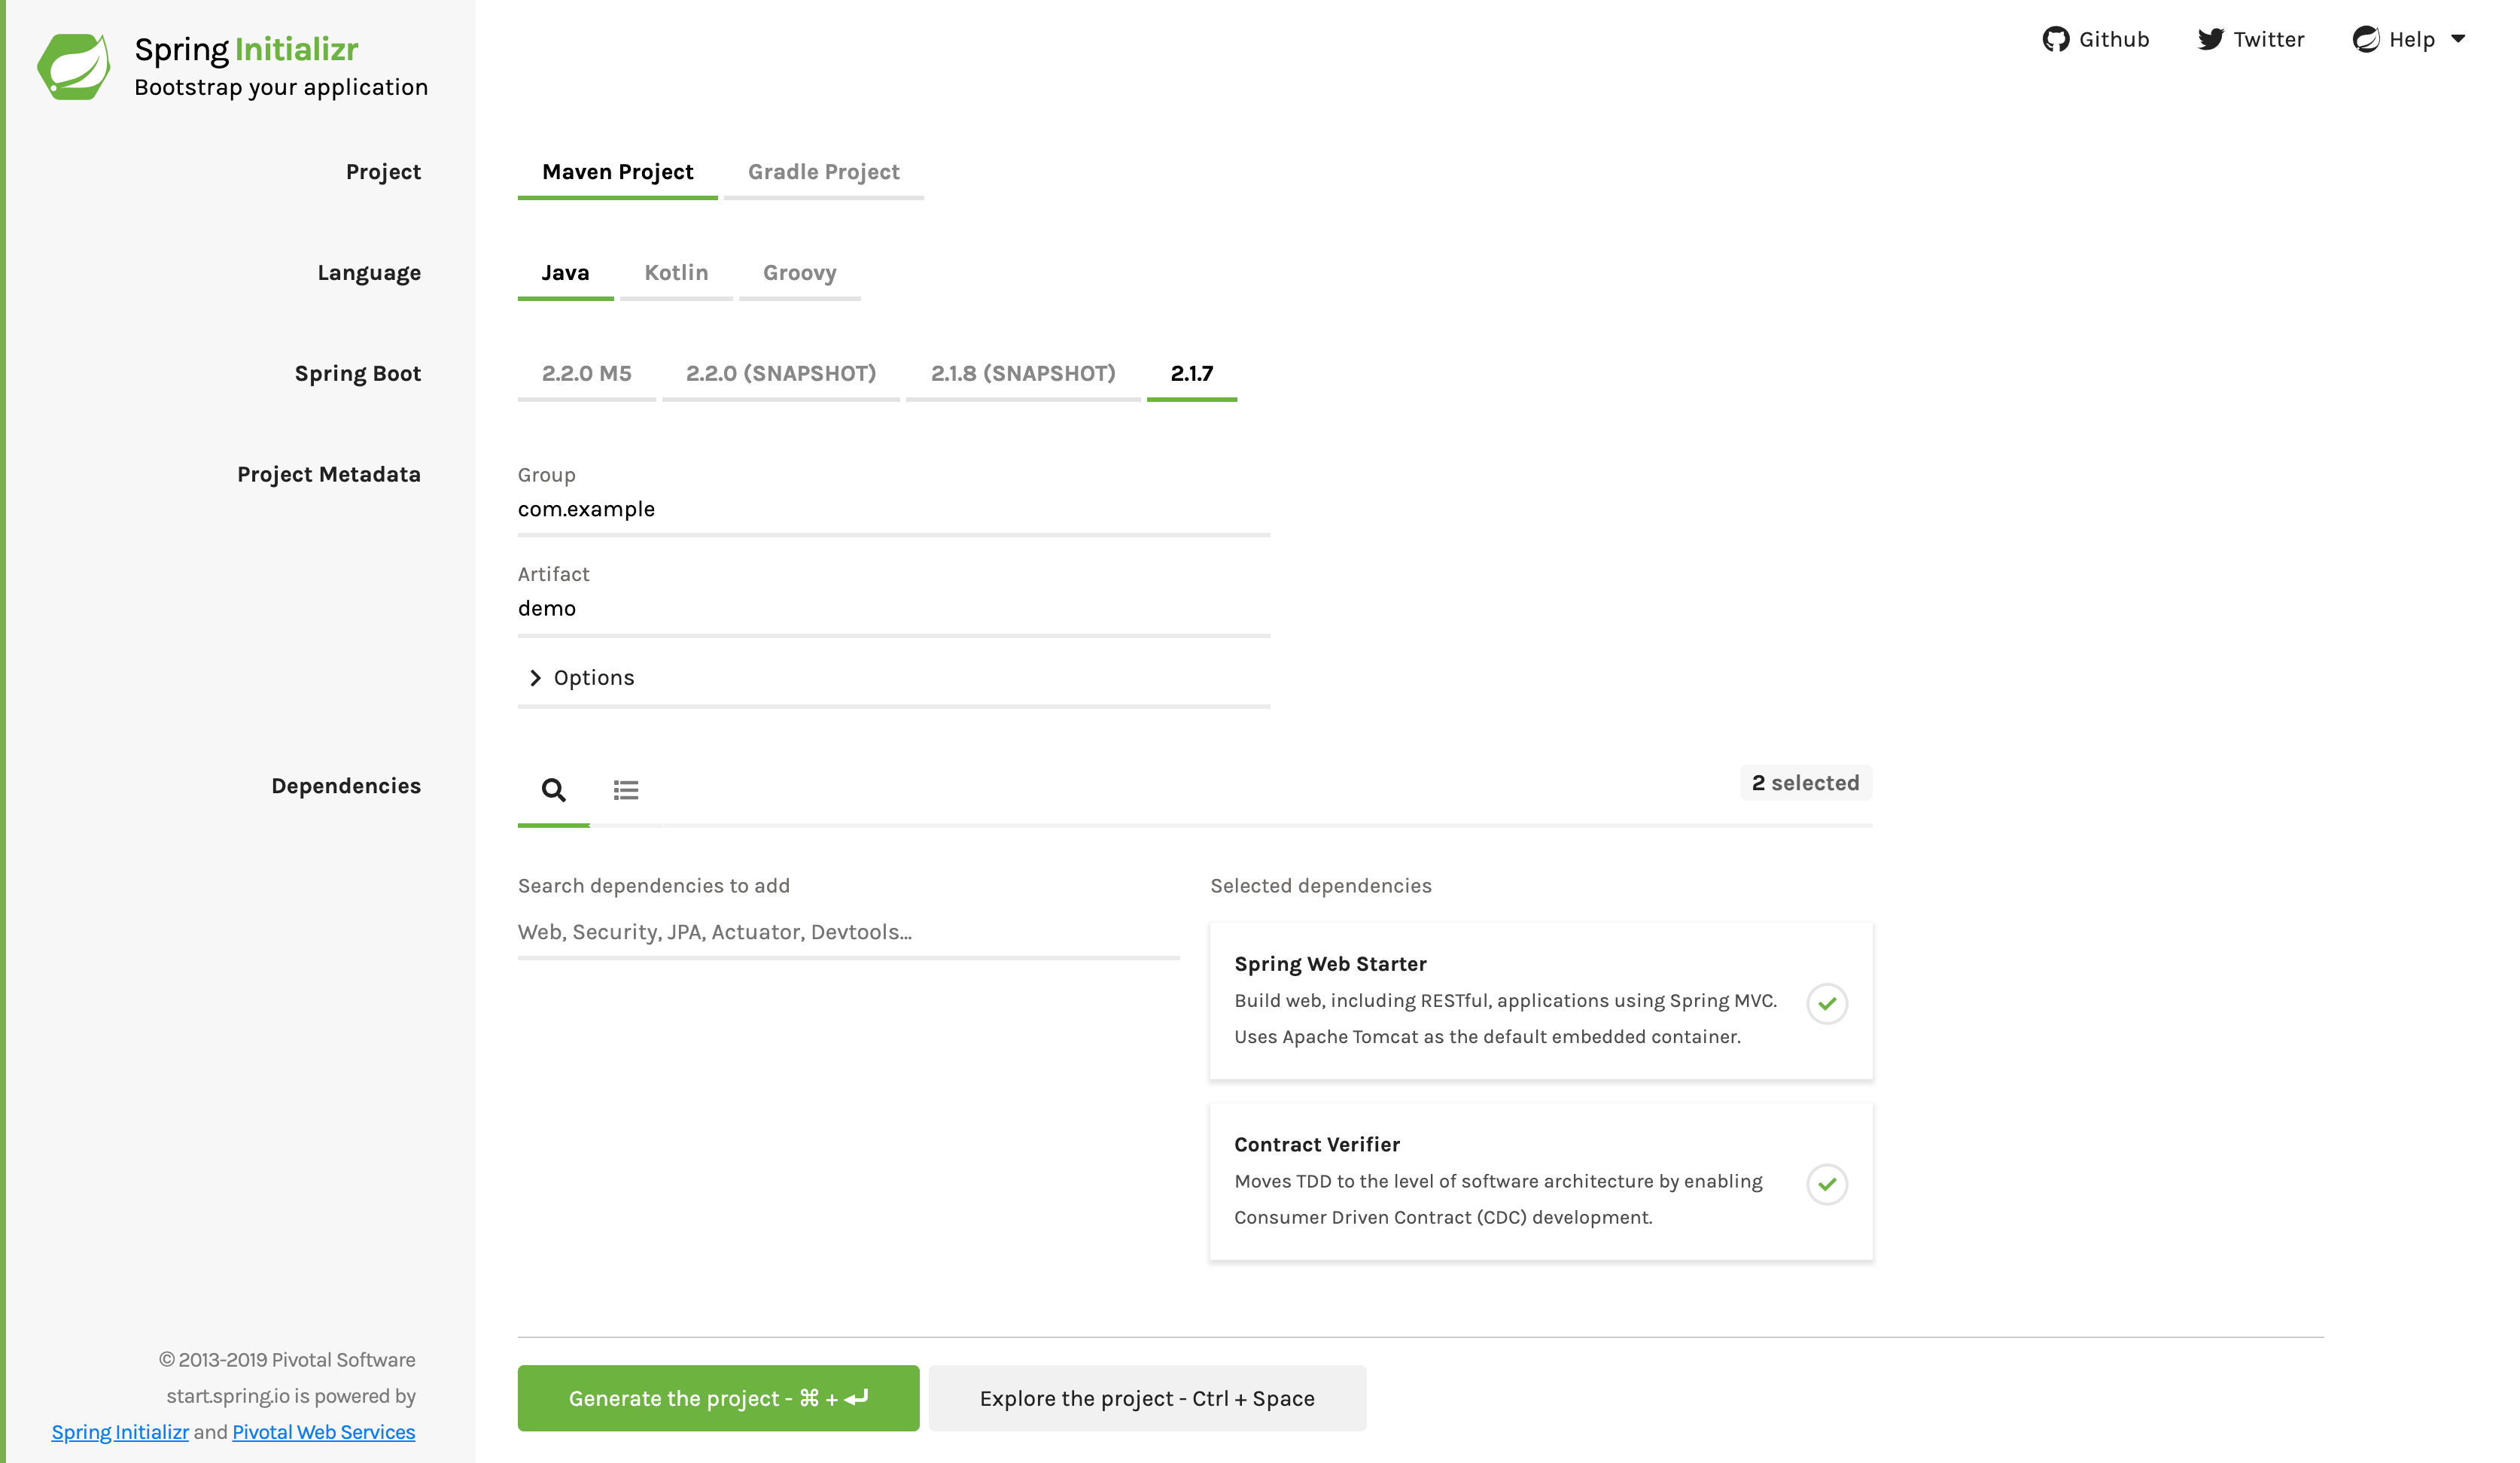
|
现在,您可以将使用 REST/ 消息契约(以 Groovy DSL 或 YAML 格式表达)的文件添加到 contracts 目录中,该目录由 contractsDslDir 属性设置。默认情况下,它为 $rootDir/src/test/resources/contracts。
请注意,文件名并不重要。您可按任意命名方案在该目录内组织您的契约。
对于 HTTP 模拟(stubs),契约定义了在给定请求条件下应返回何种响应(考虑 HTTP 方法、URL、头信息、状态码等)。以下示例展示了以 Groovy 和 YAML 格式编写的 HTTP 模拟契约:
package contracts
org.springframework.cloud.contract.spec.Contract.make {
request {
method 'PUT'
url '/fraudcheck'
body([
"client.id": $(regex('[0-9]{10}')),
loanAmount: 99999
])
headers {
contentType('application/json')
}
}
response {
status OK()
body([
fraudCheckStatus: "FRAUD",
"rejection.reason": "Amount too high"
])
headers {
contentType('application/json')
}
}
}request:
method: PUT
url: /fraudcheck
body:
"client.id": 1234567890
loanAmount: 99999
headers:
Content-Type: application/json
matchers:
body:
- path: $.['client.id']
type: by_regex
value: "[0-9]{10}"
response:
status: 200
body:
fraudCheckStatus: "FRAUD"
"rejection.reason": "Amount too high"
headers:
Content-Type: application/json;charset=UTF-8如果您需要使用消息传递功能,可以定义:
-
输入和输出消息(考虑其发送来源、消息体以及头部信息)。
-
消息接收后应调用的方法。
-
当被调用时,应触发消息的方法。
以下示例显示了一个 Camel 消息契约:
def contractDsl = Contract.make {
name "foo"
label 'some_label'
input {
messageFrom('jms:delete')
messageBody([
bookName: 'foo'
])
messageHeaders {
header('sample', 'header')
}
assertThat('bookWasDeleted()')
}
}label: some_label
input:
messageFrom: jms:delete
messageBody:
bookName: 'foo'
messageHeaders:
sample: header
assertThat: bookWasDeleted()运行 ./mvnw clean install 会自动生成测试用例,以验证应用程序对新增契约的合规性。默认情况下,生成的测试位于 org.springframework.cloud.contract.verifier.tests.。
生成的测试可能因您在插件中设置的框架和测试类型不同而有所差异。
在下一个列表中,您可以找到:
-
HTTP契约的默认测试模式为
MockMvc -
A JAX-RS 客户端,采用
JAXRS测试模式 -
A
WebTestClient-based test (this is particularly recommended while working with Reactive,Web-Flux-based applications) set with theWEBTESTCLIENTtest mode -
一个基于 Spock 的测试,
testFramework属性设置为SPOCK
| 您只需选择其中一种测试框架。MockMvc 是默认选项。若要使用其他框架,请将其库添加到您的类路径中。 |
以下列表展示了所有框架的示例:
@Test
public void validate_shouldMarkClientAsFraud() throws Exception {
// given:
MockMvcRequestSpecification request = given()
.header("Content-Type", "application/vnd.fraud.v1+json")
.body("{\"client.id\":\"1234567890\",\"loanAmount\":99999}");
// when:
ResponseOptions response = given().spec(request)
.put("/fraudcheck");
// then:
assertThat(response.statusCode()).isEqualTo(200);
assertThat(response.header("Content-Type")).matches("application/vnd.fraud.v1.json.*");
// and:
DocumentContext parsedJson = JsonPath.parse(response.getBody().asString());
assertThatJson(parsedJson).field("['fraudCheckStatus']").matches("[A-Z]{5}");
assertThatJson(parsedJson).field("['rejection.reason']").isEqualTo("Amount too high");
}@SuppressWarnings("rawtypes")
public class FooTest {
WebTarget webTarget;
@Test
public void validate_() throws Exception {
// when:
Response response = webTarget
.path("/users")
.queryParam("limit", "10")
.queryParam("offset", "20")
.queryParam("filter", "email")
.queryParam("sort", "name")
.queryParam("search", "55")
.queryParam("age", "99")
.queryParam("name", "Denis.Stepanov")
.queryParam("email", "[email protected]")
.request()
.build("GET")
.invoke();
String responseAsString = response.readEntity(String.class);
// then:
assertThat(response.getStatus()).isEqualTo(200);
// and:
DocumentContext parsedJson = JsonPath.parse(responseAsString);
assertThatJson(parsedJson).field("['property1']").isEqualTo("a");
}
}@Test
public void validate_shouldRejectABeerIfTooYoung() throws Exception {
// given:
WebTestClientRequestSpecification request = given()
.header("Content-Type", "application/json")
.body("{\"age\":10}");
// when:
WebTestClientResponse response = given().spec(request)
.post("/check");
// then:
assertThat(response.statusCode()).isEqualTo(200);
assertThat(response.header("Content-Type")).matches("application/json.*");
// and:
DocumentContext parsedJson = JsonPath.parse(response.getBody().asString());
assertThatJson(parsedJson).field("['status']").isEqualTo("NOT_OK");
}given:
ContractVerifierMessage inputMessage = contractVerifierMessaging.create(
\'\'\'{"bookName":"foo"}\'\'\',
['sample': 'header']
)
when:
contractVerifierMessaging.send(inputMessage, 'jms:delete')
then:
noExceptionThrown()
bookWasDeleted()由于尚未实现由契约所描述的功能,测试失败。
要使它们通过,您必须添加正确的实现以处理HTTP请求或消息。此外,您还必须将一个基础测试类添加到项目中,该类供自动生成的测试使用。所有自动生成的测试都继承自该类,其中应包含运行这些测试所需的所有设置信息(例如,RestAssuredMockMvc 控制器设置或消息测试设置)。
以下示例来自 pom.xml,展示了如何指定基础测试类:
<build>
<plugins>
<plugin>
<groupId>org.springframework.cloud</groupId>
<artifactId>spring-cloud-contract-maven-plugin</artifactId>
<version>2.1.2.RELEASE</version>
<extensions>true</extensions>
<configuration>
<baseClassForTests>com.example.contractTest.BaseTestClass</baseClassForTests> (1)
</configuration>
</plugin>
<plugin>
<groupId>org.springframework.boot</groupId>
<artifactId>spring-boot-maven-plugin</artifactId>
</plugin>
</plugins>
</build>
| 1 | 元素让您能够指定基础测试类。它必须是 configuration 元素的子元素,而该 configuration 元素又需位于 spring-cloud-contract-maven-plugin 元素内部。 |
以下示例显示了一个最小(但功能完整)的基础测试类:
package com.example.contractTest;
import org.junit.Before;
import io.restassured.module.mockmvc.RestAssuredMockMvc;
public class BaseTestClass {
@Before
public void setup() {
RestAssuredMockMvc.standaloneSetup(new FraudController());
}
}
这个最简化的类实际上就是您所需的一切,可使您的测试正常运行。它作为起点,自动生成功能测试将附加于此。
现在我们可以继续进行实现。为此,我们首先需要一个数据类,然后在我们的控制器中使用它。以下列表显示了该数据类:
package com.example.Test;
import com.fasterxml.jackson.annotation.JsonProperty;
public class LoanRequest {
@JsonProperty("client.id")
private String clientId;
private Long loanAmount;
public String getClientId() {
return clientId;
}
public void setClientId(String clientId) {
this.clientId = clientId;
}
public Long getLoanAmount() {
return loanAmount;
}
public void setLoanRequestAmount(Long loanAmount) {
this.loanAmount = loanAmount;
}
}
前面的类提供了一个对象,我们可以在其中存储参数。由于合同中的客户端 ID 被称为 client.id,我们需要使用 @JsonProperty("client.id") 参数将其映射到 clientId 字段。
现在我们可以继续讨论控制器,如下列表所示:
package com.example.docTest;
import org.springframework.web.bind.annotation.PutMapping;
import org.springframework.web.bind.annotation.RequestBody;
import org.springframework.web.bind.annotation.RestController;
@RestController
public class FraudController {
@PutMapping(value = "/fraudcheck", consumes="application/json", produces="application/json")
public String check(@RequestBody LoanRequest loanRequest) { (1)
if (loanRequest.getLoanAmount() > 10000) { (2)
return "{fraudCheckStatus: FRAUD, rejection.reason: Amount too high}"; (3)
} else {
return "{fraudCheckStatus: OK, acceptance.reason: Amount OK}"; (4)
}
}
}
| 1 | 我们映射传入参数到一个LoanRequest对象。 |
| 2 | 我们检查所需的贷款金额,以确保不会过多。 |
| 3 | 如果太多了,我们返回JSON(在这里用一个简单字符串创建)... |
| 4 | 如果我们有一个测试来捕捉当金额是允许的时候,我们可以匹配这个输出。 |
the FraudController is about as simple as things get. you can do much more, including
logging, validating the client id, and so on.
一旦实现和测试基类到位,测试就会通过,应用程序和存根 artifact 构建并安装在本地 Maven 仓库中。 有关将存根 jar 安装到本地存储库的信息显示在日志中,如下面的示例所示:
[INFO] --- spring-cloud-contract-maven-plugin:1.0.0.BUILD-SNAPSHOT:generateStubs (default-generateStubs) @ http-server ---
[INFO] Building jar: /some/path/http-server/target/http-server-0.0.1-SNAPSHOT-stubs.jar
[INFO]
[INFO] --- maven-jar-plugin:2.6:jar (default-jar) @ http-server ---
[INFO] Building jar: /some/path/http-server/target/http-server-0.0.1-SNAPSHOT.jar
[INFO]
[INFO] --- spring-boot-maven-plugin:1.5.5.BUILD-SNAPSHOT:repackage (default) @ http-server ---
[INFO]
[INFO] --- maven-install-plugin:2.5.2:install (default-install) @ http-server ---
[INFO] Installing /some/path/http-server/target/http-server-0.0.1-SNAPSHOT.jar to /path/to/your/.m2/repository/com/example/http-server/0.0.1-SNAPSHOT/http-server-0.0.1-SNAPSHOT.jar
[INFO] Installing /some/path/http-server/pom.xml to /path/to/your/.m2/repository/com/example/http-server/0.0.1-SNAPSHOT/http-server-0.0.1-SNAPSHOT.pom
[INFO] Installing /some/path/http-server/target/http-server-0.0.1-SNAPSHOT-stubs.jar to /path/to/your/.m2/repository/com/example/http-server/0.0.1-SNAPSHOT/http-server-0.0.1-SNAPSHOT-stubs.jar现在您可以合并这些更改并在线发布应用和存根 artifact。
3.2. 在消费者端
你可以使用 Spring Cloud Contract Stub Runner 在集成测试中获取一个正在运行的 WireMock 实例或消息路由,以模拟实际服务。
要开始,请在 Spring Cloud Contract Stub Runner 中添加依赖,如下所示:
<dependency>
<groupId>org.springframework.cloud</groupId>
<artifactId>spring-cloud-starter-contract-stub-runner</artifactId>
<scope>test</scope>
</dependency>您可以通过以下两种方式之一,将生产者端存根安装到您的Maven仓库中:
-
By checking out the Producer side repository and adding contracts and generating the stubs by running the following commands:
$ cd local-http-server-repo $ ./mvnw clean install -DskipTestsThe tests are skipped because the Producer-side contract implementation is not yet in place, so the automatically-generated contract tests fail. -
通过从远程存储库获取现有生产者服务存根。为此,
请将存根存档 ID 和存档库 URL 作为0属性传递,如下面的示例所示:stubrunner: ids: 'com.example:http-server-dsl:+:stubs:8080' repositoryRoot: https://repo.spring.io/libs-snapshot
现在您可以使用 @AutoConfigureStubRunner 在测试类上进行注解。在注解中,
为 group-id 和 artifact-id 提供 Spring Cloud Contract Stub Runner,以便为您自动运行合作者的存档,如下面的例子所示:
@RunWith(SpringRunner.class)
@SpringBootTest(webEnvironment=WebEnvironment.NONE)
@AutoConfigureStubRunner(ids = {"com.example:http-server-dsl:+:stubs:6565"},
stubsMode = StubRunnerProperties.StubsMode.LOCAL)
public class LoanApplicationServiceTests {
. . .
}在从在线仓库下载存根时使用 REMOTE 和 stubsMode,而在离线工作时使用 LOCAL。 |
在你的集成测试中,您可以接收来自合作者服务预期发出的HTTP响应或消息的存根版本。您可以在构建日志中看到类似的条目:
2016-07-19 14:22:25.403 INFO 41050 --- [ main] o.s.c.c.stubrunner.AetherStubDownloader : Desired version is + - will try to resolve the latest version
2016-07-19 14:22:25.438 INFO 41050 --- [ main] o.s.c.c.stubrunner.AetherStubDownloader : Resolved version is 0.0.1-SNAPSHOT
2016-07-19 14:22:25.439 INFO 41050 --- [ main] o.s.c.c.stubrunner.AetherStubDownloader : Resolving artifact com.example:http-server:jar:stubs:0.0.1-SNAPSHOT using remote repositories []
2016-07-19 14:22:25.451 INFO 41050 --- [ main] o.s.c.c.stubrunner.AetherStubDownloader : Resolved artifact com.example:http-server:jar:stubs:0.0.1-SNAPSHOT to /path/to/your/.m2/repository/com/example/http-server/0.0.1-SNAPSHOT/http-server-0.0.1-SNAPSHOT-stubs.jar
2016-07-19 14:22:25.465 INFO 41050 --- [ main] o.s.c.c.stubrunner.AetherStubDownloader : Unpacking stub from JAR [URI: file:/path/to/your/.m2/repository/com/example/http-server/0.0.1-SNAPSHOT/http-server-0.0.1-SNAPSHOT-stubs.jar]
2016-07-19 14:22:25.475 INFO 41050 --- [ main] o.s.c.c.stubrunner.AetherStubDownloader : Unpacked file to [/var/folders/0p/xwq47sq106x1_g3dtv6qfm940000gq/T/contracts100276532569594265]
2016-07-19 14:22:27.737 INFO 41050 --- [ main] o.s.c.c.stubrunner.StubRunnerExecutor : All stubs are now running RunningStubs [namesAndPorts={com.example:http-server:0.0.1-SNAPSHOT:stubs=8080}]4. 使用生产者端合同的消费者驱动契约(CDC)逐步指南
考虑一个欺诈检测和贷款发放流程的例子。业务场景是,我们希望向人们发放贷款,但不希望他们从我们这里窃取资金。当前系统的实现方式是向所有人发放贷款。
假设 Loan Issuance 是 Fraud Detection 服务器的客户端。在当前冲刺中,我们必须开发一项新功能:如果客户申请的贷款金额过高,我们将该客户标记为欺诈者。
技术备注
-
欺诈检测具有
artifact-id的http-server。 -
贷款发放具有
artifact-id的http-client。 -
两者都具有
group-id的com.example。 -
为了便于本示例说明,
Stub Storage代表 Nexus/Artifactory。
社交评论
-
客户端和服务器开发团队在流程中需要直接沟通并讨论变更。
-
CDC 是关于沟通的一切。
| 在这种情况下,生产者拥有合同。在物理上,所有的合同都位于生产者的存储库中。 |
4.1. 技术说明
如果您使用快照、里程碑或发行候选版本,则需要向构建中添加以下部分:
<repositories>
<repository>
<id>spring-snapshots</id>
<name>Spring Snapshots</name>
<url>https://repo.spring.io/snapshot</url>
<snapshots>
<enabled>true</enabled>
</snapshots>
</repository>
<repository>
<id>spring-milestones</id>
<name>Spring Milestones</name>
<url>https://repo.spring.io/milestone</url>
<snapshots>
<enabled>false</enabled>
</snapshots>
</repository>
<repository>
<id>spring-releases</id>
<name>Spring Releases</name>
<url>https://repo.spring.io/release</url>
<snapshots>
<enabled>false</enabled>
</snapshots>
</repository>
</repositories>
<pluginRepositories>
<pluginRepository>
<id>spring-snapshots</id>
<name>Spring Snapshots</name>
<url>https://repo.spring.io/snapshot</url>
<snapshots>
<enabled>true</enabled>
</snapshots>
</pluginRepository>
<pluginRepository>
<id>spring-milestones</id>
<name>Spring Milestones</name>
<url>https://repo.spring.io/milestone</url>
<snapshots>
<enabled>false</enabled>
</snapshots>
</pluginRepository>
<pluginRepository>
<id>spring-releases</id>
<name>Spring Releases</name>
<url>https://repo.spring.io/release</url>
<snapshots>
<enabled>false</enabled>
</snapshots>
</pluginRepository>
</pluginRepositories>repositories {
mavenCentral()
mavenLocal()
maven { url "https://repo.spring.io/snapshot" }
maven { url "https://repo.spring.io/milestone" }
maven { url "https://repo.spring.io/release" }
}为简化起见,我们使用以下缩写:
-
贷款发放(LI):HTTP 客户端
-
欺诈检测(FD):HTTP 服务器
-
SCC: Spring Cloud Contract
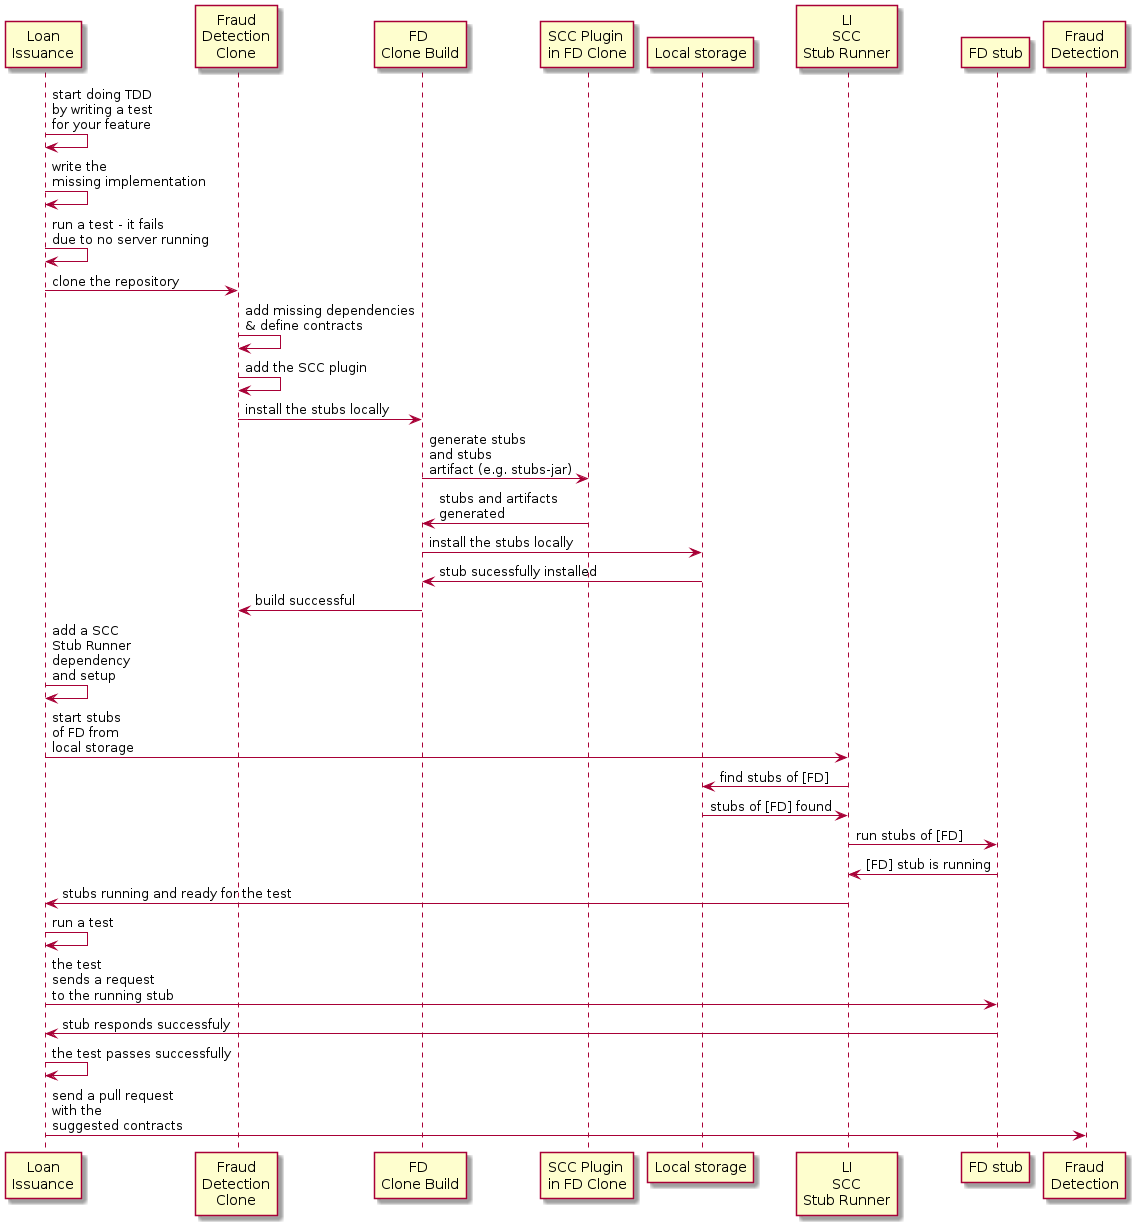
4.2. 消费者端(贷款发放)
作为贷款发放服务(欺诈检测服务器的消费者)的开发者,您可能需要执行以下步骤:
-
通过为您的功能编写测试来开始进行TDD(测试驱动开发)。
-
编写缺失的实现。
-
本地克隆欺诈检测服务仓库。
-
define the contract locally in the repository of the fraud detection service.
-
添加Spring Cloud Contract(SCC)插件。
-
运行集成测试。
-
提交Pull Request。
-
创建一个初始实现。
-
完成拉取请求。
-
编写缺失的实现。
-
部署您的应用程序。
-
在线工作。
我们先来看贷款发放流程,下图显示了该流程的 UML 图:
4.2.1. 通过为您的功能编写测试来开始TDD
下面列出了我们可能用来检查贷款金额是否过大的测试代码:
@Test
public void shouldBeRejectedDueToAbnormalLoanAmount() {
// given:
LoanApplication application = new LoanApplication(new Client("1234567890"),
99999);
// when:
LoanApplicationResult loanApplication = service.loanApplication(application);
// then:
assertThat(loanApplication.getLoanApplicationStatus())
.isEqualTo(LoanApplicationStatus.LOAN_APPLICATION_REJECTED);
assertThat(loanApplication.getRejectionReason()).isEqualTo("Amount too high");
}假设你已经编写了你新功能的测试。如果收到一笔大金额的贷款申请,系统应该拒绝该贷款申请并附带一些描述。
4.2.2. 编写缺失的实现
到某个时间点,您需要向欺诈检测服务发送请求。假设需要发送包含客户端 ID 和客户想要借款金额的请求。您要使用PUT方法将它发送到/fraudcheck URL。为此,您可以使用类似的代码:
ResponseEntity<FraudServiceResponse> response = restTemplate.exchange(
"http://localhost:" + port + fraudCheck(), HttpMethod.PUT,
new HttpEntity<>(request, httpHeaders), FraudServiceResponse.class);为了简化,欺诈检测服务的端口设置为 8080,并且应用运行在 8090 上。
如果您在此处开始测试,将会失败,因为端口8080上没有任何服务当前正在运行。 |
4.2.3. 将欺诈检测服务仓库本地克隆
你可以先从使用服务端契约开始。为此,必须首先 克隆它,通过运行以下命令:
$ git clone https://your-git-server.com/server-side.git local-http-server-repo4.2.4. 在欺诈检测服务的存储库中本地定义合约
作为消费者,您需要明确您想要实现什么目标。您需要提出您的期望。为此,您需要写下以下合同:
将合同放在src/test/resources/contracts/fraud文件夹中。fraud文件夹很重要,因为生产者的测试基础类名引用了该文件夹。 |
以下示例展示了我们的契约,包括Groovy和YAML两种形式:
/*
* Copyright 2013-2020 the original author or authors.
*
* Licensed under the Apache License, Version 2.0 (the "License");
* you may not use this file except in compliance with the License.
* You may obtain a copy of the License at
*
* https://www.apache.org/licenses/LICENSE-2.0
*
* Unless required by applicable law or agreed to in writing, software
* distributed under the License is distributed on an "AS IS" BASIS,
* WITHOUT WARRANTIES OR CONDITIONS OF ANY KIND, either express or implied.
* See the License for the specific language governing permissions and
* limitations under the License.
*/
package contracts
org.springframework.cloud.contract.spec.Contract.make {
request { // (1)
method 'PUT' // (2)
url '/fraudcheck' // (3)
body([ // (4)
"client.id": $(regex('[0-9]{10}')),
loanAmount : 99999
])
headers { // (5)
contentType('application/json')
}
}
response { // (6)
status OK() // (7)
body([ // (8)
fraudCheckStatus : "FRAUD",
"rejection.reason": "Amount too high"
])
headers { // (9)
contentType('application/json')
}
}
}
/*
From the Consumer perspective, when shooting a request in the integration test:
(1) - If the consumer sends a request
(2) - With the "PUT" method
(3) - to the URL "/fraudcheck"
(4) - with the JSON body that
* has a field `client.id` that matches a regular expression `[0-9]{10}`
* has a field `loanAmount` that is equal to `99999`
(5) - with header `Content-Type` equal to `application/json`
(6) - then the response will be sent with
(7) - status equal `200`
(8) - and JSON body equal to
{ "fraudCheckStatus": "FRAUD", "rejectionReason": "Amount too high" }
(9) - with header `Content-Type` equal to `application/json`
From the Producer perspective, in the autogenerated producer-side test:
(1) - A request will be sent to the producer
(2) - With the "PUT" method
(3) - to the URL "/fraudcheck"
(4) - with the JSON body that
* has a field `client.id` that will have a generated value that matches a regular expression `[0-9]{10}`
* has a field `loanAmount` that is equal to `99999`
(5) - with header `Content-Type` equal to `application/json`
(6) - then the test will assert if the response has been sent with
(7) - status equal `200`
(8) - and JSON body equal to
{ "fraudCheckStatus": "FRAUD", "rejectionReason": "Amount too high" }
(9) - with header `Content-Type` matching `application/json.*`
*/request: # (1)
method: PUT # (2)
url: /yamlfraudcheck # (3)
body: # (4)
"client.id": 1234567890
loanAmount: 99999
headers: # (5)
Content-Type: application/json
matchers:
body:
- path: $.['client.id'] # (6)
type: by_regex
value: "[0-9]{10}"
response: # (7)
status: 200 # (8)
body: # (9)
fraudCheckStatus: "FRAUD"
"rejection.reason": "Amount too high"
headers: # (10)
Content-Type: application/json
#From the Consumer perspective, when shooting a request in the integration test:
#
#(1) - If the consumer sends a request
#(2) - With the "PUT" method
#(3) - to the URL "/yamlfraudcheck"
#(4) - with the JSON body that
# * has a field `client.id`
# * has a field `loanAmount` that is equal to `99999`
#(5) - with header `Content-Type` equal to `application/json`
#(6) - and a `client.id` json entry matches the regular expression `[0-9]{10}`
#(7) - then the response will be sent with
#(8) - status equal `200`
#(9) - and JSON body equal to
# { "fraudCheckStatus": "FRAUD", "rejectionReason": "Amount too high" }
#(10) - with header `Content-Type` equal to `application/json`
#
#From the Producer perspective, in the autogenerated producer-side test:
#
#(1) - A request will be sent to the producer
#(2) - With the "PUT" method
#(3) - to the URL "/yamlfraudcheck"
#(4) - with the JSON body that
# * has a field `client.id` `1234567890`
# * has a field `loanAmount` that is equal to `99999`
#(5) - with header `Content-Type` equal to `application/json`
#(7) - then the test will assert if the response has been sent with
#(8) - status equal `200`
#(9) - and JSON body equal to
# { "fraudCheckStatus": "FRAUD", "rejectionReason": "Amount too high" }
#(10) - with header `Content-Type` equal to `application/json`YML 协议很简单。但是,当您查看使用强类型 Groovy DSL 编写的协议时,可能会想知道这些代码 0 部分是什么意思。通过使用这种表示法,Spring Cloud Contract 允许您为 JSON 块、URL 或其他结构定义部分,这些部分是动态的。在这种情况下,标识符或时间戳不需要硬编码值。您需要允许一些不同的值范围。要启用值范围,可以设置匹配这些值的正则表达式,以便在使用者端。您可以使用映射语法或带有插值的字符串提供正文。我们强烈建议使用映射语法。
To set up contracts, you must understand the map notation. See theGroovy docs regarding JSON. |
之前展示的合同是双方之间的协议,规定了:
-
如果HTTP请求中包含了以下所有内容:
-
A
PUTmethod on the/fraudcheckendpoint -
A JSON body with a
client.idthat matches the regular expression[0-9]{10}andloanAmountequal to99999 -
A
Content-Type标头的值为application/vnd.fraud.v1+json
-
-
然后向消费者发送HTTP响应
-
无状态信息
-
包含一个带有值
FRAUD的fraudCheckStatus字段和带值Amount too high的rejectionReason字段的 JSON 载荷。 -
Has a
Content-Typeheader with a value ofapplication/vnd.fraud.v1+json
-
一旦你准备好在集成测试中实践检查API,就需要在本地安装存档。
4.2.5. 添加 Spring Cloud Contract Verifier 插件
我们可以在Maven或Gradle中添加插件。在本示例中,我们将展示如何添加Maven插件。
首先,如下面的示例所示,我们需要添加Spring Cloud Contract BOM:
<dependencyManagement>
<dependencies>
<dependency>
<groupId>org.springframework.cloud</groupId>
<artifactId>spring-cloud-dependencies</artifactId>
<version>${spring-cloud-release.version}</version>
<type>pom</type>
<scope>import</scope>
</dependency>
</dependencies>
</dependencyManagement>接下来,添加 Spring Cloud Contract Verifier Maven 插件,如下示例所示:
<plugin>
<groupId>org.springframework.cloud</groupId>
<artifactId>spring-cloud-contract-maven-plugin</artifactId>
<version>${spring-cloud-contract.version}</version>
<extensions>true</extensions>
<configuration>
<packageWithBaseClasses>com.example.fraud</packageWithBaseClasses>
<!-- <convertToYaml>true</convertToYaml>-->
</configuration>
<!-- if additional dependencies are needed e.g. for Pact -->
<dependencies>
<dependency>
<groupId>org.springframework.cloud</groupId>
<artifactId>spring-cloud-contract-pact</artifactId>
<version>${spring-cloud-contract.version}</version>
</dependency>
</dependencies>
</plugin>自从添加了插件,您就获得了提供的合同提供的Spring Cloud Contract Verifier个功能:
-
生成并运行测试
-
生成并安装存根
你不想生成测试用例,因为你作为消费者只想玩弄桩。你需要跳过测试生成和调用。为此,运行以下命令:
$ cd local-http-server-repo
$ ./mvnw clean install -DskipTests一旦你运行这些命令,你就会在日志中看到如下内容:
[INFO] --- spring-cloud-contract-maven-plugin:1.0.0.BUILD-SNAPSHOT:generateStubs (default-generateStubs) @ http-server ---
[INFO] Building jar: /some/path/http-server/target/http-server-0.0.1-SNAPSHOT-stubs.jar
[INFO]
[INFO] --- maven-jar-plugin:2.6:jar (default-jar) @ http-server ---
[INFO] Building jar: /some/path/http-server/target/http-server-0.0.1-SNAPSHOT.jar
[INFO]
[INFO] --- spring-boot-maven-plugin:1.5.5.BUILD-SNAPSHOT:repackage (default) @ http-server ---
[INFO]
[INFO] --- maven-install-plugin:2.5.2:install (default-install) @ http-server ---
[INFO] Installing /some/path/http-server/target/http-server-0.0.1-SNAPSHOT.jar to /path/to/your/.m2/repository/com/example/http-server/0.0.1-SNAPSHOT/http-server-0.0.1-SNAPSHOT.jar
[INFO] Installing /some/path/http-server/pom.xml to /path/to/your/.m2/repository/com/example/http-server/0.0.1-SNAPSHOT/http-server-0.0.1-SNAPSHOT.pom
[INFO] Installing /some/path/http-server/target/http-server-0.0.1-SNAPSHOT-stubs.jar to /path/to/your/.m2/repository/com/example/http-server/0.0.1-SNAPSHOT/http-server-0.0.1-SNAPSHOT-stubs.jar重要的是:
[INFO] Installing /some/path/http-server/target/http-server-0.0.1-SNAPSHOT-stubs.jar to /path/to/your/.m2/repository/com/example/http-server/0.0.1-SNAPSHOT/http-server-0.0.1-SNAPSHOT-stubs.jar它确认了存档文件夹中的http-server已安装在本地存储库中。
4.2.6. 运行集成测试
为了从 Spring Cloud Contract Stub Runner 功能中获得自动存档下载的好处,您必须在消费方侧项目(0)中执行以下操作:Loan
Application service:
-
Add the
Spring Cloud ContractBOM, as follows:<dependencyManagement> <dependencies> <dependency> <groupId>org.springframework.cloud</groupId> <artifactId>spring-cloud-dependencies</artifactId> <version>${spring-cloud-release-train.version}</version> <type>pom</type> <scope>import</scope> </dependency> </dependencies> </dependencyManagement> -
Add the dependency to
Spring Cloud Contract Stub Runner, as follows:<dependency> <groupId>org.springframework.cloud</groupId> <artifactId>spring-cloud-starter-contract-stub-runner</artifactId> <scope>test</scope> </dependency> -
使用注解标注您的测试类
@AutoConfigureStubRunner。在注解中提供group-id和artifact-id,以便 Stub Runner 下载您协同对象的占位程序。@SpringBootTest(webEnvironment = WebEnvironment.NONE) @AutoConfigureStubRunner(ids = { "com.example:http-server-dsl:0.0.1:stubs"}, stubsMode = StubRunnerProperties.StubsMode.LOCAL) public class LoanApplicationServiceTests { -
(可选) 因为您离线与合作者一起玩,所以也可以提供离线工作开关 (0)。
现在,当你运行你的测试时,你将在日志中看到如下输出:
2016-07-19 14:22:25.403 INFO 41050 --- [ main] o.s.c.c.stubrunner.AetherStubDownloader : Desired version is + - will try to resolve the latest version
2016-07-19 14:22:25.438 INFO 41050 --- [ main] o.s.c.c.stubrunner.AetherStubDownloader : Resolved version is 0.0.1-SNAPSHOT
2016-07-19 14:22:25.439 INFO 41050 --- [ main] o.s.c.c.stubrunner.AetherStubDownloader : Resolving artifact com.example:http-server:jar:stubs:0.0.1-SNAPSHOT using remote repositories []
2016-07-19 14:22:25.451 INFO 41050 --- [ main] o.s.c.c.stubrunner.AetherStubDownloader : Resolved artifact com.example:http-server:jar:stubs:0.0.1-SNAPSHOT to /path/to/your/.m2/repository/com/example/http-server/0.0.1-SNAPSHOT/http-server-0.0.1-SNAPSHOT-stubs.jar
2016-07-19 14:22:25.465 INFO 41050 --- [ main] o.s.c.c.stubrunner.AetherStubDownloader : Unpacking stub from JAR [URI: file:/path/to/your/.m2/repository/com/example/http-server/0.0.1-SNAPSHOT/http-server-0.0.1-SNAPSHOT-stubs.jar]
2016-07-19 14:22:25.475 INFO 41050 --- [ main] o.s.c.c.stubrunner.AetherStubDownloader : Unpacked file to [/var/folders/0p/xwq47sq106x1_g3dtv6qfm940000gq/T/contracts100276532569594265]
2016-07-19 14:22:27.737 INFO 41050 --- [ main] o.s.c.c.stubrunner.StubRunnerExecutor : All stubs are now running RunningStubs [namesAndPorts={com.example:http-server:0.0.1-SNAPSHOT:stubs=8080}]This output means that Stub Runner has found your stubs and started a server for your application with a group ID of com.example and an artifact ID of http-server with version 0.0.1-SNAPSHOT of the stubs and with the stubs classifier on port 8080.
4.2.7. 提交拉取请求
您到目前为止所做的就是一个迭代过程。您可以围绕契约进行尝试,将其安装在本地,并在消费者一侧进行工作,直到契约按照您的期望工作。
一旦对结果满意并且测试通过,就可以向服务器端提交pull请求。目前,消费端的工作已经完成。
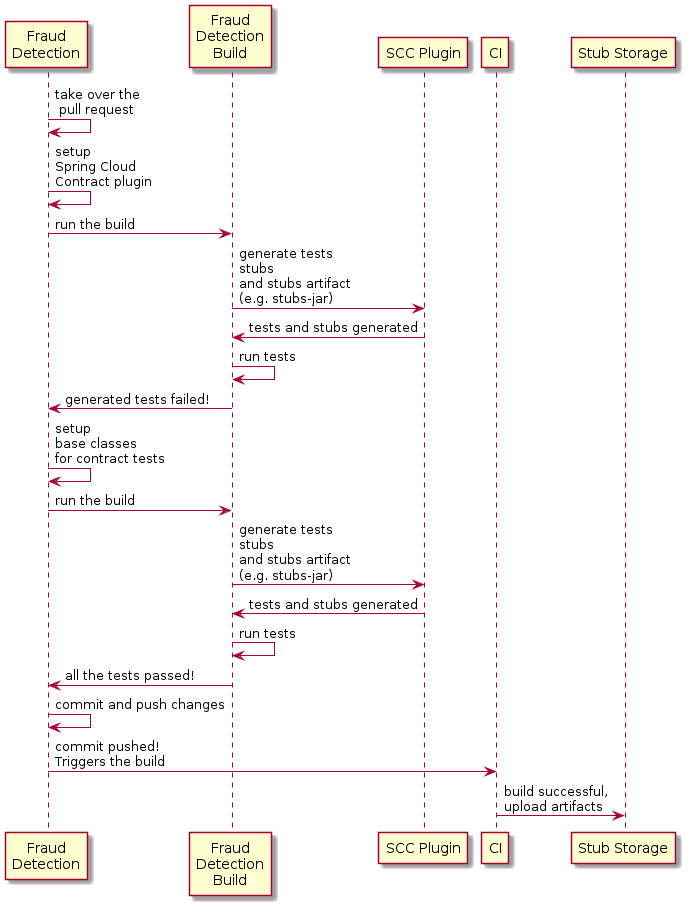
4.3. 生产者端(欺诈检测服务器)
作为贷款发放服务的开发人员,您可能希望执行以下操作:
-
接手拉取请求
-
编写缺失的实现
-
部署应用程序
以下UML图展示了欺诈检测流程:
4.3.1. 接管拉取请求
作为提醒,下表显示了初始实现。
@RequestMapping(value = "/fraudcheck", method = PUT)
public FraudCheckResult fraudCheck(@RequestBody FraudCheck fraudCheck) {
return new FraudCheckResult(FraudCheckStatus.OK, NO_REASON);
}然后,您可以运行以下命令:
$ git checkout -b contract-change-pr master
$ git pull https://your-git-server.com/server-side-fork.git contract-change-pr您必须添加自动生成测试所需的依赖项,如下所示:
<dependency>
<groupId>org.springframework.cloud</groupId>
<artifactId>spring-cloud-starter-contract-verifier</artifactId>
<scope>test</scope>
</dependency>在Maven插件的配置中,必须传递packageWithBaseClasses属性,如下:
<plugin>
<groupId>org.springframework.cloud</groupId>
<artifactId>spring-cloud-contract-maven-plugin</artifactId>
<version>${spring-cloud-contract.version}</version>
<extensions>true</extensions>
<configuration>
<packageWithBaseClasses>com.example.fraud</packageWithBaseClasses>
<!-- <convertToYaml>true</convertToYaml>-->
</configuration>
<!-- if additional dependencies are needed e.g. for Pact -->
<dependencies>
<dependency>
<groupId>org.springframework.cloud</groupId>
<artifactId>spring-cloud-contract-pact</artifactId>
<version>${spring-cloud-contract.version}</version>
</dependency>
</dependencies>
</plugin>本示例通过设置属性packageWithBaseClasses来使用“基于约定”的命名。这样做意味着最后两个包组合起来构成了基础测试类的名称。在我们的例子中,合同被放在了src/test/resources/contracts/fraud文件夹下。由于您从contracts文件夹开始没有两个包,只需选择一个,应该是fraud。添加后缀Base并首字母大写fraud。这就为您提供了FraudBase测试类名。 |
All the generated tests extend that class. Over there, you can set up your Spring Context or whatever is necessary. In this case, you should use Rest Assured MVC to start the server side FraudDetectionController. The following listing shows the FraudBase class:
/*
* Copyright 2013-2020 the original author or authors.
*
* Licensed under the Apache License, Version 2.0 (the "License");
* you may not use this file except in compliance with the License.
* You may obtain a copy of the License at
*
* https://www.apache.org/licenses/LICENSE-2.0
*
* Unless required by applicable law or agreed to in writing, software
* distributed under the License is distributed on an "AS IS" BASIS,
* WITHOUT WARRANTIES OR CONDITIONS OF ANY KIND, either express or implied.
* See the License for the specific language governing permissions and
* limitations under the License.
*/
package com.example.fraud;
import io.restassured.module.mockmvc.RestAssuredMockMvc;
import org.junit.jupiter.api.BeforeEach;
public class FraudBase {
@BeforeEach
public void setup() {
RestAssuredMockMvc.standaloneSetup(new FraudDetectionController(),
new FraudStatsController(stubbedStatsProvider()));
}
private StatsProvider stubbedStatsProvider() {
return fraudType -> {
switch (fraudType) {
case DRUNKS:
return 100;
case ALL:
return 200;
}
return 0;
};
}
public void assertThatRejectionReasonIsNull(Object rejectionReason) {
assert rejectionReason == null;
}
}现在,如果您运行 0,则会得到如下输出:
Results :
Tests in error:
ContractVerifierTest.validate_shouldMarkClientAsFraud:32 » IllegalState Parsed...此错误发生的原因是,您有一个新的合同,从该合同中生成了测试用例,并且它在您尚未实现该功能时失败。自动生成的测试方法可能如下所示:
@Test
public void validate_shouldMarkClientAsFraud() throws Exception {
// given:
MockMvcRequestSpecification request = given()
.header("Content-Type", "application/vnd.fraud.v1+json")
.body("{\"client.id\":\"1234567890\",\"loanAmount\":99999}");
// when:
ResponseOptions response = given().spec(request)
.put("/fraudcheck");
// then:
assertThat(response.statusCode()).isEqualTo(200);
assertThat(response.header("Content-Type")).matches("application/vnd.fraud.v1.json.*");
// and:
DocumentContext parsedJson = JsonPath.parse(response.getBody().asString());
assertThatJson(parsedJson).field("['fraudCheckStatus']").matches("[A-Z]{5}");
assertThatJson(parsedJson).field("['rejection.reason']").isEqualTo("Amount too high");
}如果您使用Groovy DSL,您会发现Contract中所有出现在producer()块中的value(consumer(…), producer(…))部分都注入了测试。如果您使用YAML,则对于matchers部分的response也同样适用。
请注意,在生产者一侧,你也进行着TDD。期望以测试的形式表达:该测试会向我们自己的应用程序发送具有在合同中定义的URL、头信息和正文的请求,并期望响应中精确定义的值。换句话说,你已经有了red部分的red、green和refactor。现在要把red转换为green。
4.3.2. 编写缺失的实现
因为您知道预期的输入和输出,所以可以按照如下方式编写缺失的实现:
@RequestMapping(value = "/fraudcheck", method = PUT)
public FraudCheckResult fraudCheck(@RequestBody FraudCheck fraudCheck) {
if (amountGreaterThanThreshold(fraudCheck)) {
return new FraudCheckResult(FraudCheckStatus.FRAUD, AMOUNT_TOO_HIGH);
}
return new FraudCheckResult(FraudCheckStatus.OK, NO_REASON);
}当您再次运行./mvnw clean install时,测试将通过。由于Spring Cloud
合同验证器插件会将这些测试添加到您的generated-test-sources中,因此您实际上可以从您的IDE中运行这些测试。
4.3.3. 部署您的应用程序
完成工作后,您可以部署所做的更改。为此,您必须首先通过运行以下命令合并分支:
$ git checkout master
$ git merge --no-ff contract-change-pr
$ git push origin master你的CI可能会运行一个命令,例如./mvnw clean deploy,这将同时发布应用程序和存根(stub)工件。
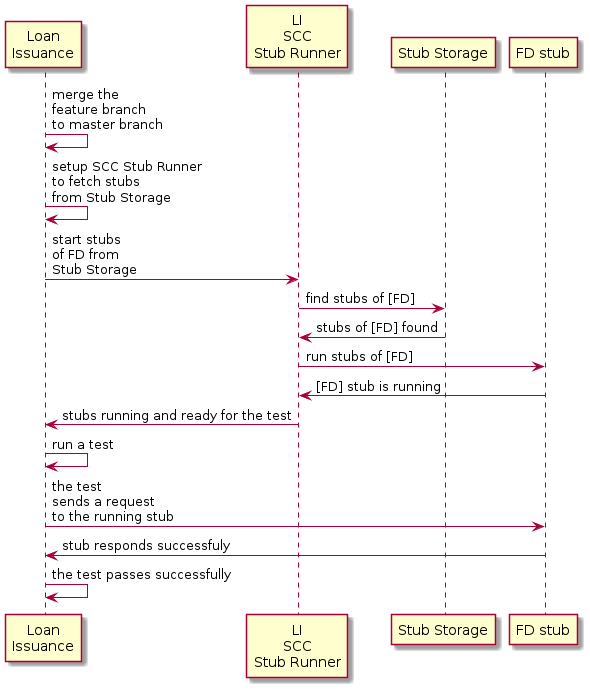
4.4. 消费者端(贷款发放),最后一步
作为贷款发放服务的开发者(欺诈检测服务器的消费者),你需要:
-
合并我们的功能分支到
master -
切换到在线工作模式
下面的UML图展示了该过程的最终状态:
4.4.1. 将分支合并到主干
以下命令展示了一种使用 Git 将分支合并到 master 的方式:
$ git checkout master
$ git merge --no-ff contract-change-pr4.4.2. 在线工作
现在,您可以为Spring Cloud Contract Stub Runner禁用离线工作,并指定存放开桩的仓库位置。目前,服务器端的开桩会自动从Nexus/Artifactory下载。可以将stubsMode的值设置为REMOTE。以下代码通过更改属性展示了实现相同功能的方法:
stubrunner:
  ids: 'com.example:http-server-dsl:+:stubs:8080'
repositoryRoot: https://repo.spring.io/libs-snapshot教程到此结束。
5. 后续步骤
希望本节提供了一些 Spring Cloud Contract 的基础知识,并帮助您开始编写自己的应用程序。如果您是一个任务导向型的开发者,您可以跳转到 spring.io 并查看一些解决特定“如何使用Spring?”问题的入门指南。我们还有 Spring Cloud Contract 特定的“操作指南”参考文档。
否则,下一步是阅读使用Spring Cloud Contract。如果你非常急切,也可以直接跳到Spring Cloud Contract特性部分。
此外,您还可以查看以下视频:
-
“消费者驱动契约与您的微服务架构”(作者:Olga Maciaszek-Sharma 和 Marcin Grzejszczak)
-
“企业中的契约测试” 作者:马辛·格热什查克
-
“为什么契约测试很重要?” 作者:马辛·格热什查克
您可以在 samples 中找到默认项目示例。
您可以在 这里 找到 Spring Cloud Contract 工作坊。