快速开始
1. Spring Cloud Sleuth 简介
Spring Cloud Sleuth 可以跟踪您的请求和消息,以便您可以将这些通信与相应的日志条目关联起来。
您还可以将追踪信息导出到外部系统以可视化延迟。
Spring Cloud Sleuth 直接支持 OpenZipkin 兼容系统。
1.1. Terminology
Spring Cloud Sleuth 采用 Dapper 的术语。
Span: 基本的工作单元。 例如,发送 RPC 是新的跨度,发送对 RPC 的响应也是一种跨度。 这些跨度还有其他数据,如描述、带时间戳的事件、键值注释(标记),以及引起它们的跨度的 ID,以及进程 ID(通常为 IP 地址)。
可以开始和停止跨度,它们会跟踪其计时信息。</p><p>一旦创建了一个跨度,就必须在将来某个时候停止它。
强**调:一组形成树状结构的跨度。
例如,如果您运行分布式大型数据存储,则跟踪可能由PUT请求组成。
< strong > 注释/事件: < / strong > 用于记录时间中事件的存在。
在典型的RPC场景中,我们将这些事件标记为以下内容,以突出显示发生了哪种类型的操作(这并不意味着这些事件实际上会在跨度上设置)。
-
客户端已发送。
客户端已发出请求。
此注释指示跨度的开始。 -
sr: 服务器接收到:服务器端已经接收到请求并开始处理它。从这个时间戳减去
cs时间戳就可以得出网络延迟。 -
ss: 服务器发送时间。在完成请求处理(当响应发送回客户端)后注释。用零时间戳减去此计时器可得出服务器端处理请求所需的时间.
-
cr: 客户端已接收。表示跨度的结束。客户端已成功从服务器端接收到响应。通过用此时间戳减去
cs时间戳,可以揭示客户端从服务器接收响应所需的全部时间。
下图显示了跨度和跟踪在系统中的样子。
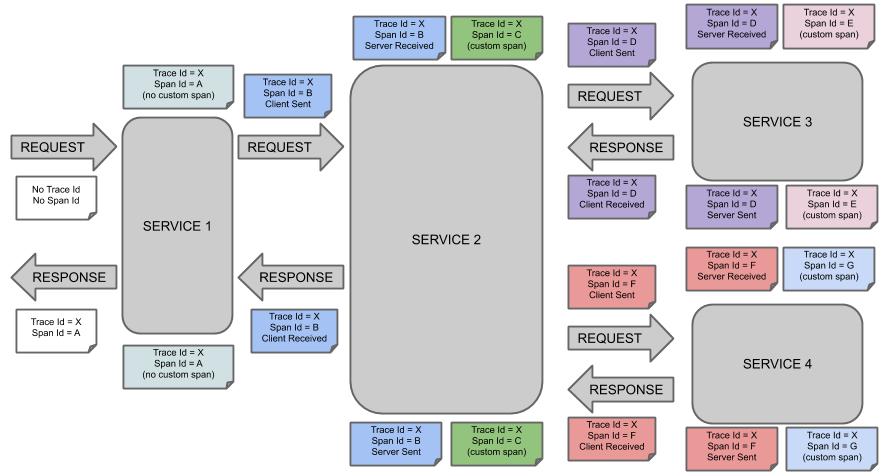
音符的每种颜色代表一个音程(共有七个音程——从A到G)。
考虑以下音符:
Trace Id = X
Span Id = D
Client Sent此注释表明当前跨度的跟踪 ID设置为X,跨度 ID设置为D。此外,从RPC的角度来看,事件Client Sent已经发生。
让我们考虑更多的笔记:
Trace Id = X
Span Id = A
(no custom span)

Trace Id = X
Span Id = C
(custom span)您可以继续使用已创建的跨度(例如带有no custom span指示的跨度),或者手动创建子跨度(例如带有custom span指示的跨度)。
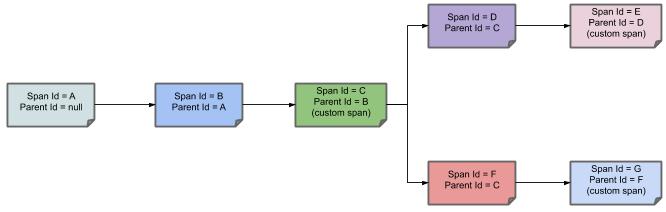
下图显示了跨度的父-子关系:<br>
2. 开发您的第一个基于 Spring Cloud Sleuth 的应用程序
本节介绍如何开发一个小型“Hello World!”Web应用程序,该程序突出显示了Spring Cloud Sleuth的一些关键功能。我们使用Maven构建此项目,因为大多数IDE都支持它。作为追踪器实现,我们将使用OpenZipkin Brave。
|
你可以通过访问start.spring.io并从依赖搜索器中选择“Web”和“Spring Cloud Sleuth”Starters来简化以下步骤。这样做会生成一个新的项目结构,以便你可以立即开始编码。 |
2.1. 创建POM
我们需要从创建一个 Maven pom.xml 文件开始。
pom.xml 是用于构建项目的设计说明。
打开你最喜欢的文本编辑器,添加如下内容:
<?xml version="1.0" encoding="UTF-8"?>
<project xmlns="http://maven.apache.org/POM/4.0.0" xmlns:xsi="http://www.w3.org/2001/XMLSchema-instance"
    xsi:schemaLocation="http://maven.apache.org/POM/4.0.0 https://maven.apache.org/xsd/maven-4.0.0.xsd">
    <modelVersion>4.0.0</modelVersion>

    <groupId>com.example</groupId>
    <artifactId>myproject</artifactId>
    <version>0.0.1-SNAPSHOT</version>

    <parent>
        <groupId>org.springframework.boot</groupId>
        <artifactId>spring-boot-starter-parent</artifactId>
        <!-- Use the latest compatible Spring Boot version. You can check https://spring.io/projects/spring-cloud for more information -->
        <version>$2.4.10</version>
    </parent>

    <!-- Spring Cloud Sleuth requires a Spring Cloud BOM -->
    <dependencyManagement>
        <dependencies>
            <dependency>
                <groupId>org.springframework.cloud</groupId>
                <artifactId>spring-cloud-dependencies</artifactId>
                <!-- Provide the latest stable Spring Cloud release train version (e.g. 2020.0.0) -->
                <version>${release.train.version}</version>
                <type>pom</type>
                <scope>import</scope>
            </dependency>
        </dependencies>
    </dependencyManagement>

    <!-- (you don't need this if you are using a GA version) -->
    <repositories>
        <repository>
            <id>spring-snapshots</id>
            <url>https://repo.spring.io/snapshot</url>
            <snapshots><enabled>true</enabled></snapshots>
        </repository>
        <repository>
            <id>spring-milestones</id>
            <url>https://repo.spring.io/milestone</url>
        </repository>
    </repositories>
    <pluginRepositories>
        <pluginRepository>
            <id>spring-snapshots</id>
            <url>https://repo.spring.io/snapshot</url>
        </pluginRepository>
        <pluginRepository>
            <id>spring-milestones</id>
            <url>https://repo.spring.io/milestone</url>
        </pluginRepository>
    </pluginRepositories>
</project>
前面的清单应该能生成一个可工作的构建。
你可以通过运行 mvn package 来测试它(目前,您可以忽略“jar 将为空 - 没有内容被标记为包含!”警告)。
| 在此步骤中,您可以将项目导入到IDE(大多数现代Java IDE都内置了对Maven的支持)。 出于简化考虑,我们继续使用纯文本编辑器作为本例中的工具。 |
2.2. 添加类路径依赖项
要添加必要的依赖项,请编辑您的pom.xml文件,并在spring-boot-starter-web部分下方立即添加parent依赖项:
<dependencies>
    <!-- Boot's Web support -->
    <dependency>
        <groupId>org.springframework.boot</groupId>
        <artifactId>spring-boot-starter-web</artifactId>
    </dependency>
    <!-- Sleuth with Brave tracer implementation -->
    <dependency>
        <groupId>org.springframework.cloud</groupId>
        <artifactId>spring-cloud-starter-sleuth</artifactId>
    </dependency>
</dependencies>
2.3. 编写代码
完成应用程序,我们需要创建单个Java文件。
默认情况下,Maven从src/main/java编译源代码,因此您需要创建该目录结构,然后添加一个名为src/main/java/Example.java的文件来包含以下代码:
import org.slf4j.Logger;
import org.slf4j.LoggerFactory;
import org.springframework.boot.*;
import org.springframework.boot.autoconfigure.*;
import org.springframework.web.bind.annotation.*;

@RestController
@EnableAutoConfiguration
public class Example {

    private static final Logger log = LoggerFactory.getLogger(Backend.class);

    @RequestMapping("/")
    String home() {
        log.info("Hello world!");
        return "Hello World!";
    }

    public static void main(String[] args) {
        SpringApplication.run(Example.class, args);
    }

}
尽管这里的代码不多,但发生了很多事情。 我们在接下来的几节中依次介绍重要的部分。
@RestController 和 @RequestMapping 注解
Spring Boot 设置了 Rest Controller 并使我们的应用程序绑定到 Tomcat 端口。<br />Spring Cloud Sleuth 配合 Brave 跟踪器将提供对传入请求的检测。
2.4. 运行示例
至此,您的应用程序应该可以正常运行。
由于您使用了spring-boot-starter-parent POM,因此您可以利用其中有用的 run 目标来启动应用程序。
在项目根目录下输入 SPRING_APPLICATION_NAME=backend mvn spring-boot:run 来启动应用程序。
您应该会看到类似以下的输出:
$ mvn spring-boot:run

  .   ____          _            __ _ _
 /\\ / ___'_ __ _ _(_)_ __  __ _ \ \ \ \
( ( )\___ | '_ | '_| | '_ \/ _` | \ \ \ \
 \\/  ___)| |_)| | | | | || (_| |  ) ) ) )
  '  |____| .__|_| |_|_| |_\__, | / / / /
 =========|_|==============|___/=/_/_/_/
 ...
....... . . .
....... . . . (log output here)
....... . . .
........ Started Example in 2.222 seconds (JVM running for 6.514)
如果您在web浏览器中打开localhost:8080,您应该会看到以下输出:
Hello World!
如果您查看日志,应该会看到类似的输出
2020-10-21 12:01:16.285 INFO [backend,0b6aaf642574edd3,0b6aaf642574edd3] 289589 --- [nio-9000-exec-1] Example : Hello world!
您可以注意到,日志格式已更新为包含以下信息 [backend,0b6aaf642574edd3,0b6aaf642574edd3。
此条目对应于 [application name,trace id, span id]。
应用程序名称是从 SPRING_APPLICATION_NAME 环境变量中读取的。
与其在处理程序中显式记录请求,不如设置logging.level.org.springframework.web.servlet.DispatcherServlet=DEBUG。 |
要优雅地退出应用,请按 ctrl-c。
3. 后续步骤
希望本节提供了一些Spring Cloud Sleuth基础知识,并帮助您开始编写自己的应用程序。
如果您是任务导向型开发者,可以跳到spring.io查看一些解决特定“如何使用Spring?”问题的
入门指南。
我们还有针对Spring Cloud Sleuth的“操作指南”参考文档。
否则,下一步是阅读使用Spring Cloud Sleuth。如果您非常急切,也可以跳到Spring Cloud Sleuth功能。
您可以在 samples 中找到默认项目示例。